

How To Download Cs Go Mods Text Color Mod
![]()
![]()
![]()
![]()
Contents
- one Intro and Nuts
- 2 Make the raw overview paradigm
- 3 Create the .DDS
- three.1 Using Photoshop
- 3.two Using GIMP
- 4 Create the overview script
- 5 Adding Multiple Heights
- 6 Conclusion
- 7 Resource
- 8 Other Tutorials
Intro and Basics
Some mods (Counter-Strike:Source, Mean solar day of Defeat:Source) have a mini-map style, that shows a level overview and projects players and objects on that map. An overview map is an image made from in-game screenshots and must be created one time a new map is finished.
Counter-Strike: Global Offensive also has a mini-map characteristic. From the player'southward signal of view, the mini-map behaves the same in game equally in previous versions of Counter-Strike. But from a programmer indicate of view quite a few things have changed from creating a level overview in Counter-Strike: Source.
The large differences are:
- In CS:GO the map overview is referred to as the "radar."
- CS:Become doesn't utilise VTFs and VMTs for the radar.
- In CS:GO radar files are saved every bit a ".DDS" file.
- There are only two necessary files to get a basic mini-map working the '.DDS" and a ".txt". The ".DDS" serves as the map overview paradigm, and the ".txt" tells the Source engine how to brandish the overview.
To compare the differences in finer detail, read: Level Overviews and run into how to make a level overview for Counter-Strike: Source.
Brand the raw overview image
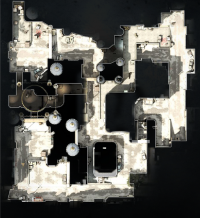
Sample level overview (de_dust2)
- Outset the game. Click Options and switch to the Video tab. Change Resolution to "1280x1024" pixels and the Aspect Ratio to "Normal".If yous take problem setting the resolution (modest screen),y'all can add a startup selection " -width 1280 -height 1024".
- Load the new level with the map
<mapname>console command and enable"sv_cheats ane". - Bring together a squad.
- Plow off bots in the map.
"bot_quota 1"using the console. - Bind the "screenshot" command to a key, etc.
"demark p screenshot"using the console. This is important, every bit using the default screenshot key (F5) volition take a compressed JPEG rather than a raw TGA. - Remove any HUD elements with console commands
"cl_drawhud 0","r_drawviewmodel 0"and"hidepanel all". - Remove agonizing world effects like skyboxes (
"r_skybox 0"), fog ("fog_override 1"and"fog_enable 0"), props (optional:"r_drawstaticprops 0"), etc. - Turn off player clipping.
"noclip"using the console. Then move to a position where you tin meet the whole level from above. - Switch to orthographic mode with the console control
"cl_leveloverview 10", where x is the scale factor. - Set
"cl_leveloverviewmarker 1024"to show a reddish helper line on the right. You will need to briefly togglecl_drawhud i, line information technology up, and then toggle the HUD off again. - You lot can motion around while cl_leveloverview manner is on. You lot are yet in spectator mode and moving, then motility the arrow keys to change the position. Now change scale and so the map fits into the foursquare defined by the scarlet line. The right edge of your map should exist on the left of the red line, anything to the right of the cherry line volition exist chopped off in a afterward step. Check the attached screenshot to encounter how this step looks in
de_dust2. - The current projection data (position and scale) will be updated in the console, eg "Overview:
scale vi.00, pos_x -2651, pos_y 4027". - Once everything is perfect, accept a screenshot (using the primal you bound to "screenshot") and write down the project data values. You will need them in a afterward pace.
Here are all the needed commands as bind:
- o => Overview-Fashion
- p => Have screenshot
//Overview-Manner //Script past The RaZZeR App demark "o" "change_resolution; clear_view; clear_map; clear_game; record_config; radar_image"; bind "p" "screenshot"; allonym "change_resolution" " mat_setvideomode 1280 1024 1;"; allonym "clear_view" "sv_cheats 1; cl_drawhud 0; r_drawviewmodel 0; hidepanel all; net_graph 0;"; allonym "clear_map" "bot_quota 1; bot_kick all; r_skybox 0; fog_override 1; fog_enable 0"; alias "clear_game" "mp_freezetime 0; mp_roundtime 9999; mp_roundtime_defuse 9999; mp_roundtime_hostage 9999; mp_roundtime_deployment 9999; mp_warmup_end;"; alias "record_config" "con_logfile overview_info.log;"; alias "radar_image" "noclip; cl_leveloverviewmarker 1024; cl_leveloverview 5";
![]() Tip: Create a file like overviewexec.cfg (or something else), paste everything from above into this cfg. Move the file to csgo/cfg/ and run "exec overviewexec" in the console.
Tip: Create a file like overviewexec.cfg (or something else), paste everything from above into this cfg. Move the file to csgo/cfg/ and run "exec overviewexec" in the console.
This script dumps the console output in a log file which is saved at "csgo/overview_info.log". Also the resolution gets changed to 1280x1024 (four:3) windowed.
Create the .DDS
Using Photoshop
- Start upwards Photoshop and open the .TGA file that you lot created. It should be located at
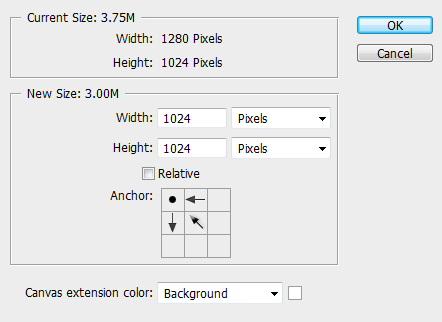
"%STEAMINSTALL%\SteamApps\mutual\Counter-Strike Global Offensive\csgo\screenshots". Where"%STEAMINSTALL%"is the directory in which you have steam installed. This is most probable"C:\Program Files (x86)\Steam". - Using the Sail Size tool (Image -> Sail Size) set the new width of the prototype to be 1024 pixels. And in the ballast department click the top-left box.
- In the layers console double click on the layer labeled Background. A "New Layer" window volition pop up, press OK.
- Select areas of the image which you wish to be transparent when on the mini-map, and then printing the backspace key.
- Some people like to add different colored features to their mini-maps, if you wish to practise then practice that at present.
- Save the image as a .DDS file. (File -> Salvage Equally). The file name should exist your map proper name followed past
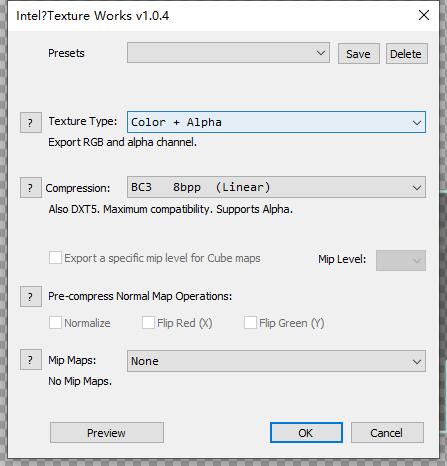
"_radar"ex. (de_dust_radar.dds). The file format should be D3D/DDS. Salvage the file to"%STEAMINSTALL%\SteamApps\mutual\Counter-Strike Global Offensive\csgo\resources\overviews" - When the Intel Texture Works dialog box opens click the drop down box at the tiptop left, and change the "Texture Type" and "Compression" option from
"Color"and"BC1 4bpp(Linear)"to"Color + Alpha"and"BC3 8bpp(Linear)"As shown in the paradigm below.
- You lot now take successfully created the .DDS file for your map.
![]() Note: If the "Save Equally..." .DDS file option is non available to you, and then you lot might demand to download a photoshop plug-in. Y'all tin can go it off of the Intel website here: Intel® Texture Works Plugin for Photoshop (NVIDIA Texture Tools has outdated for a long time)
Note: If the "Save Equally..." .DDS file option is non available to you, and then you lot might demand to download a photoshop plug-in. Y'all tin can go it off of the Intel website here: Intel® Texture Works Plugin for Photoshop (NVIDIA Texture Tools has outdated for a long time)
Using GIMP
(this tutorial was written using GIMP two.6, only should work for all GIMP ii.x)
- Download and install the GIMP DDS Plugin ii.0.ii.
- Start up GIMP and open the .TGA file that y'all created. It should be located at "%STEAMINSTALL%\SteamApps\common\Counter-Strike Global Offensive\csgo\screenshots". Where "%STEAMINSTALL%" is the directory in which you lot have steam installed. This is nearly likely "C:\Program Files (x86)\Steam".
- Using the Canvas Size tool (Prototype -> Canvas Size) set the new width of the image to be 1024 pixels. keep the Summit at 1024.
- Select areas of the image which you wish to be transparent when on the mini-map, so press the delete key.
- Some people like to add together unlike colored features to their mini-maps, if you lot wish to practise and then do that now.
- Save the image as a .DDS file. (File -> Salvage As). The file proper name should be your map name followed by "_radar" ex. (de_dust_radar.dds). The file format should be D3D/DDS. Save the file to "%STEAMINSTALL%\SteamApps\common\Counter-Strike Global Offensive\csgo\resource\overviews".
- When the DDS dialog box opens click the drib downwardly box at the peak left, and change the compression drop down from "None", to "BC1/DXT1". Click "OK".
- You lot now take successfully created the .DDS file for your map.
Create the overview script
Finally, create a text file called <mapname>.txt in <game dir>\resource\overviews\. This file will ascertain the precise numbers needed to align the overview. The following is an example taken from de_vertigo:
For your map'south script utilize the project data that you wrote downward in stride 12 of Make the raw overview paradigm
// HLTV overview description file for de_vertigo.bsp "de_vertigo" { "fabric" "overviews/de_vertigo_radar" // texture file "pos_x" "-3168" // X coordinate "pos_y" "1762" // Y coordinate "scale" "iv.0" // calibration used when taking the screenshot "rotate" "0" // map was rotated by ninety degrees in image editor "zoom" "one.3" // optimal zoom factor if map is shown in full size //loading screen icons and positions "CTSpawn_x" "0.22" "CTSpawn_y" "0.73" "TSpawn_x" "0.63" "TSpawn_y" "0.ten" "bombA_x" "0.17" "bombA_y" "0.78" "bombB_x" "0.73" "bombB_y" "0.68" "Hostage1_x" "0.56" "Hostage1_y" "0.83" "Hostage2_x" "0.48" "Hostage2_y" "0.64" "Hostage3_x" "0.47" "Hostage3_y" "0.78" "Hostage4_x" "0.30" "Hostage4_y" "0.88" "Hostage5_x" "0.42" "Hostage5_y" "0.86" } "pos_x" (ruby line) and "pos_y" (dark-green line) represent to the top view of Hammer where X is left/right and Y is down/upward. Lowering the calibration makes the radar bigger.
To get the correct positions of all loading screen icons you take to open up your finished radar file in Photoshop. Then press Ctrl+R to become the Ruler-Tool (make sure it's ready to pct). You get the correct value by dragging the top and left ruler. Note that for case 31.12% are written similar 0.31.
Adding Multiple Heights
Later the Wildfire update to CSGO you can now have multiple summit images added to your radar. This is done by creating multiple radar files with your different paths highlighted depending on the histrion's height in the world. Yous can reference the new de_nuke for examples inside your game'south files.
- mapname_lower_radar
- mapname_radar (This is the basis floor)
- mapname_higher_radar
Then add the following to your overview text file.
"verticalsections" { "default" // employ the principal radar image { "AltitudeMax" "600" "AltitudeMin" "-500" } "lower" // lower radar file { "AltitudeMax" "-500" "AltitudeMin" "-10000" } "higher" // college radar file { "AltitudeMax" "10000" "AltitudeMin" "600" } } - Type "cl_showpos i" in game panel check the Distance.
- The higher/lower .dds files will not be included past the Workshop publishing tool, and must be packed manually to be used on the Steam Workshop.
![]() Annotation: The section names are not required to be named "lower", "higher" and "default". Any proper name is possible and it'due south possible to have many more than 3 sections.
Annotation: The section names are not required to be named "lower", "higher" and "default". Any proper name is possible and it'due south possible to have many more than 3 sections.
Conclusion
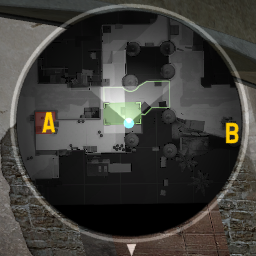
Beneath is a screen capture of the radar in game. If you followed all the steps correctly, and so the finished product should look something like this:
Resources
Bombsite Clear Bombsite A
  Bombsite B
CT Icon  T Icon
  Hostage Icon
New T spawn Icon ![]()
Other Tutorials
- TopHATTwaffle'south CS:GO Radar / Overview Creation Tutorial
- TopHATTwaffle's Tutorial about Terri Auto Radar for CS:Go
- TAR (Terri Auto Radar)
- How to utilize CS:GO Radar Maker

How To Download Cs Go Mods Text Color Mod,
Source: https://developer.valvesoftware.com/wiki/Creating_a_working_mini-map
Posted by: barrenhersentooped.blogspot.com
0 Response to "How To Download Cs Go Mods Text Color Mod"
Post a Comment